Jmeter Randomization Part 4 – RandomFromMultipleVars

If your test needs to randomize values from a static list of values, there are a number of ways to script this.  Jmeter has a new built in function called RandomFromMultipleVars which I have found to be a great time saver.

First create a UDV.  For this example I have created five variables with corresponding static values.  The variable is an animal and the value is a type of animal.

01_udv

Next add a sampler with a JSR223 PreProcessor and paste this code:

String randAnimal = "${__RandomFromMultipleVars(dog|cat|cow|horse|bird)}";
log.info("Random animal type is " + randAnimal);

Please note that there are double quotes around the function call.  This is to ensure that the value is stored as a string.

Open the log viewer and run a few threads.

You should see the value randomized for each thread:

02_log


Jmeter Randomization Part 3 – Random String

In parts 1 and 2 we saw how to randomize numbers and dates.  In this post we are going to generate random strings to create random names.  There is a built in randomization function called RandomString which can be used for this purpose.

It can be called at the beginning of your test in the UDV, which will only randomize once.

  • The first name will be 7 random letters from the alphabet.
  • The last name will be 8 random letters from the alphabet.

RandomString(length of random string, string to be randomized, optional)

01_udv

02_udvoutput

You can also randomize values for every thread using a Processor.

In this case we are going to utilize the optional third argument, where we specify the name of the variable to store the random value inside.

RandomString(length of random string, string to be randomized, name of variable)

//randomize first name
${__RandomString(7, abcdefghijklmnopqrstuvwxyz, RNDFIRST)};
log.info("RNDFIRST = " + vars.get("RNDFIRST"));

//randomize last name
${__RandomString(8, abcdefghijklmnopqrstuvwxyz, RNDLAST)};
log.info("RNDLAST = " + vars.get("RNDLAST"));

As seen below, each thread should have unique random values:

03_rndthreads

Jmeter Randomization Part 2 – Random Date

Here is a java code example that will generate a random date between 1900 and 2000:

import java.text.SimpleDateFormat;

// randomize DOB
int rndMonth = ${__Random(1,12)};
int rndDay = ${__Random(1,28)};
int rndYear = ${__Random(1900,2000)};
String rndDob = rndMonth + "/" + rndDay + "/" + rndYear;
SimpleDateFormat source = new SimpleDateFormat("mm/dd/yyyy");
SimpleDateFormat target = new SimpleDateFormat("yyyy-mm-dd");
Date date = source.parse(rndDob);
// convert to yyyy-mm-dd format
String RNDDOB = target.format(date);
log.info("Date is = " + RNDDOB);

This is what you should see in the log console (with different random values for every thread):

02_logConsole

Jmeter Randomization Part 1 – Random

When running load tests with jmeter, we are primarily concerned with the overall performance of the application.  If functional testing is a secondary concern, running the exact same data over and over again is an easy habit to fall into.

In any type of test suite, it is a best practice to vary the data.  If you are using a CSV data file to drive the test, you can vary the data in your test rows.  Keep in mind that the CSV is a finite list which can be recycled when using jmeter’s CSV Data Set Config.

Luckily there are a number of ways to randomize your data inside jmeter.  In this tutorial series we are going to look at how to randomize your test data during runtime.

Inside this UDV is a javascript function which generates a random integer between the range of 300 and 900:

01_udvRand

However, since this randomization is happening inside the UDV, the value is only randomized once at the beginning of the test.  So if the randomized value is 777, that variable value will not change and will be 777 for all threads.

If you want to randomize values for all threads, you need to use a processor.

In this example we will use a JSR223 Pre Processor with a few lines of java:

//randomize credit score
int RNDSCR = ${__Random(300, 900)};
log.info("RNDSCR = " + RNDSCR);

This is what you should see in the log console (with different random values for every thread):

02_logConsole


Jmeter Thread Classes Part 3 – PREV

The PREV variable is synonymous with the SamplerResult Jmeter class.  PREV allows your Jmeter script to access thread specific methods and data created by the test sampler.  To see a list of all available methods, please refer to the official Apache documentation.

I have found that these methods are helpful when testing REST API responses:

log.info("Response Timestamp = " + prev.getTimeStamp());
log.info("Response Code = " + prev.getResponseCode());
log.info("Response Message = " + prev.getResponseMessage());
log.info("Response Headers =  " + prev.getResponseHeaders());
log.info("Response String = " + prev.getResponseDataAsString());

01_log

In addition, there are also SET methods that allow you to update specific values during runtime:

prev.setSampleLabel("This thread is fantastic");

prev.setContentType("text/xml");

Jmeter Thread Classes Part 2 – CTX

The CTX variable is another Jmeter thread class, which provides access to the JMeterContext API.  Similar to the VARS thread class, the context of this variable is thread specific and should not be considered “global” or “thread-safe”.

For a detailed list of all available methods, please refer to the official Apache documentation.  Here are some examples:

int tdNumber = ctx.getThreadNum();
String tdStart = ctx.getThread().getStartTime();
String tdEnd = ctx.getThread().getEndTime();
String respCode = ctx.getPreviousResult().getResponseCode();
String respMsg = ctx.getPreviousResult().getResponseMessage();

log.info("Thread Number is: " + tdNumber);
log.info("Thread Start Time is: " + tdStart);
log.info("Thread End Time is: " + tdEnd);
log.info("Previous Response Code is: " + respCode);
log.info("Previous Response Message is: " + respMsg);

After running one thread, your log viewer should look like this:

01_log

Jmeter Thread Classes Part 1 – VARS

If you look closely at the fine print inside a Pre Processor or Post Processor, you will see a list of Jmeter variables which are available inside a Jmeter thread:

01_script

These variables are specific to each thread, so they should not be considered global variables.  In this post we will explore the VARS variable, which is a Jmeter thread class.  The most commonly used methods of this class are PUT and GET.

There are a number of ways to initialize the variable.  In this example I have created a placeholder variable called “myValue” inside the UDV:

03_udv

To set the current value of the variable, use the PUT method:

String newValue = "NewNewNew";
vars.put("myValue", newValue);

When using the PUT method, this will overwrite any previous value that was stored in that variable.

Instead of using a placeholder variable, you can also initialize a VARS variable inside an Extractor or Post Processor element:

post

Once the value of VARS is set, you can use this variable in your requests like this:

02_myvalue

To access the current value of VARS, use the GET method:

String currValue = vars.get("myValue");
log.info("This is the stored value = " + currValue);

Remember that these variables are thread specific, so the values can be different inside each thread.  Conversely they can also be the same.

JSR223 Tips and Tricks Part 5

Jmeter is a wonderful tool but it does not work with excel out of the box.  In order to use excel in your jmeter script, you must download Fillo or a similar jar.  Fortunately, jmeter has built-in support for CSV file handling (input and output).

Let’s pretend that you have been given a new project where you need to test a web service and save the server response to a file.  If the response is formatted as JSON and you open the CSV file to view in excel, the response is comma delimited and will be split into separate columns.  If you are dealing with large and/or dynamic JSON responses, this can become very messy.  In order to view the entire JSON response in one cell, we need to use a workaround.

In this tutorial, we will use the public Star Wars API again.  Jmeter will send a GET request to the server and then the script will write the JSON response to file.

First create a new jmeter script that looks like the node tree below:

01_tree

Setup the HTTP Request sampler as follows:

02_http

Setup the HTTP Header Manager as follows:

03_header

Inside the JSR223 Post Processor, select beanshell as the language and paste this code:

import net.minidev.json.parser.JSONParser;

//get the JSON response from prev sampler
String getResponse = prev.getResponseDataAsString();

//parse the response and convert to string
JSONParser parser = new JSONParser(JSONParser.MODE_JSON_SIMPLE);
String parResponse = parser.parse(getResponse);
String preResponse = parResponse.toString();

//replace all commas with a semi-colon
String csvResponse = preResponse.replaceAll(",", ";");

//log response to file
logFileName = "C:/apache-jmeter-3.0/Web_Service_Output.csv";
BufferedWriter outLog = new BufferedWriter(new FileWriter(logFileName, true));
outLog.write(csvResponse + "\n");
outLog.close();

The code example above uses two jars.  Both of these jars are included in the standard version of jmeter, so you do not need to download any additional jars:

  1.  JSONParser – this is used to parse the JSON data
  2.  BufferedWriter – this is used to write to a CSV file

When the CSV file is opened in excel or another spreadsheet application, the entire JSON will be displayed in a single cell.  Here is a screenshot from Google Sheets:

04_cell

05_greedo

JSR223 Tips and Tricks Part 4

In this post we are going to continue using the same script from Part 3.  This is a simple example which demonstrates how to update a single field value in the JSON body data.

First right-click to add a JSR223 Post Processor to the test script:

01_postproc

Next select groovy as the programming language and paste the following code.  Note that we are using two groovy jars (1) JsonSlurper (2) JsonBuilder

import groovy.json.JsonSlurper
import groovy.json.JsonBuilder

//parse json using JsonSlurper
def slurpy = new JsonSlurper().parseText(vars.get("jsonBodyData"))

//update field value "custname" and rebuild json using JsonBuilder
def builder = new JsonBuilder(slurpy)

//update value of custname field
builder.content.custname = 'NewName'
vars.put("jsonBodyData", builder.toPrettyString()) 
log.info("builder = " + "\n" + builder.toPrettyString())

Now open the log viewer and run the script, the output should look like this:

02_viewer


JSR223 Tips and Tricks Part 3

When doing API testing, you may find that your test data can become unmanageable.  For example, if your test uses a collection of XML files or JSON files, your data files can become accumulate and become cluttered.  To reduce this technical debt, consider creating your test data dynamically using a single data file.

In the first tutorial in this series, I ran a GET request against a public API.
In the second tutorial, I showed how to easily build JSON data using a string.
In this installment we will generate JSON data using a CSV data file.

First add two more variables to your UDV:

01_udv

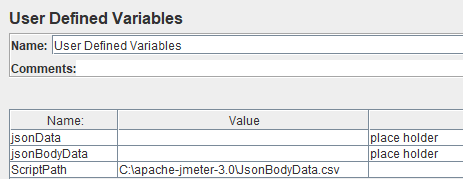
${jsonBodyData} = This will be used to store the new JSON body data
${ScriptPath} = This is the local path where the CSV is saved

Next create a CSV file to hold your test data:

(Text format)

02_textcsv

(Spreadsheet format)

03_spreadcsv

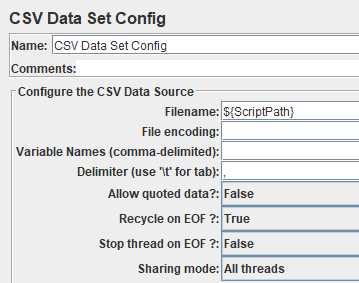
In order to pull test data from the CSV file, you must add a config element to the script called CSV Data Config.  Assign the ${ScriptPath} variable inside this element:

05_csvconfig

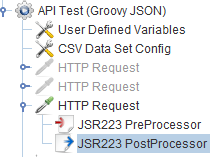
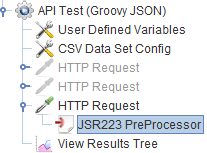
Now add an HTTP Request to your script and a JSR223 PreProcessor underneath.

04_pre

Select groovy in the language dropdown and paste the following code:

import groovy.json.*
import groovy.json.JsonBuilder

def jsonBuilder = new groovy.json.JsonBuilder()
jsonBuilder
{
 custid Integer.parseInt(vars.get("customerId"))
 custname vars.get("customerName")
 ordcolor vars.get("orderColor")
 ordnumber Integer.parseInt(vars.get("orderNumber"))
}

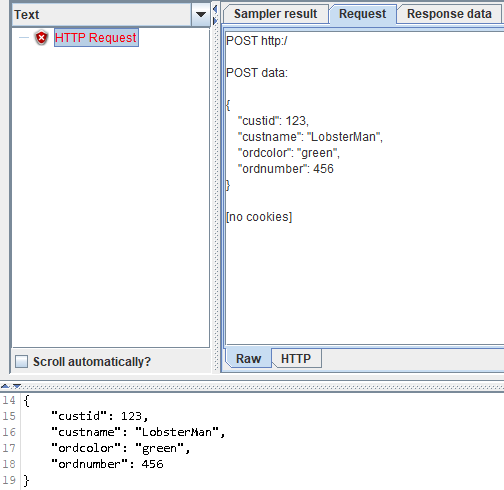
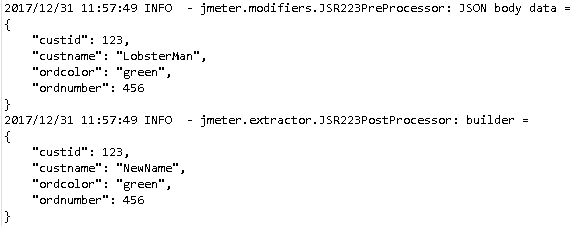
vars.put("jsonBodyData", jsonBuilder.toPrettyString())
log.info("JSON body data = " + "\n" + vars.get("jsonBodyData"))

In this example we used a groovy jar called JsonBuilder to build the request data.  Please note that the customerId and orderNumber were both formatted as an Integer.

The JSON data has been formatted and saved inside the ${jsonBodyData} variable.

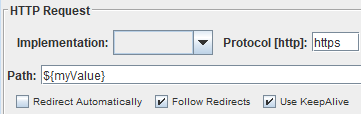
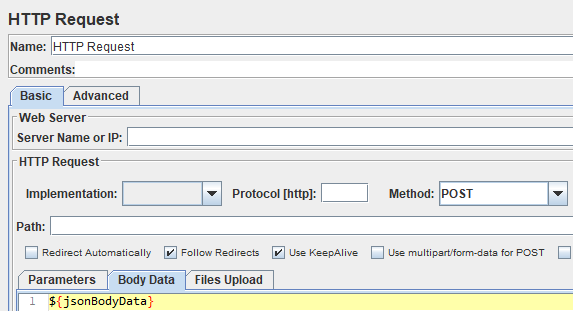
Apply this variable to the HTTP Request.  Also, make sure that the POST method has been selected inside the HTTP Request:

06_body

Run the request.  If everything has been setup correctly, you should see the formatted JSON data inside the listener and the log viewer.

07_viewdata