JSR223 Tips and Tricks Part 2

In this tutorial I will demonstrate how to create and store JSON data using groovy.

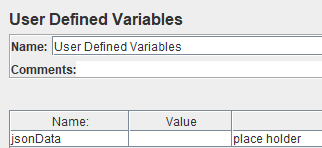
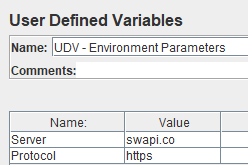
First add a UDV to your test script and create an empty variable called ${jsonData}

01_udv

Next create a new HTTP Request and add a JSR223 PreProcessor below it.  Select groovy as the programming language in the dropdown and paste this code inside your script:

import groovy.json.JsonOutput;

def uName = "Lobster Man"
def uId = 7
def jsonString = ["name": uName, "id" : uId]
def jsonFormat = JsonOutput.prettyPrint(JsonOutput.toJson(jsonString))

log.info("\n" + jsonFormat)
vars.put("jsonData", jsonFormat)

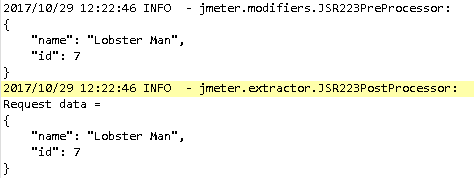
Open the log viewer, run the script, and you should see the following:

02_info

Also, note that the formatted JSON was stored inside the UDV variable ${jsonData} by using the vars.put method.

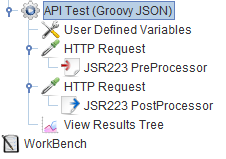
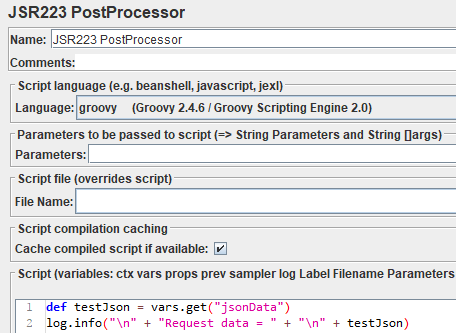
Next add another HTTP Request sampler to your test script and add a JSR223 Post Processor below it.  Your script should now look something like this:

07_script

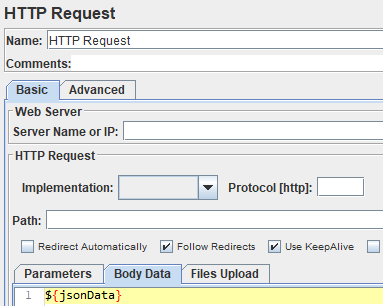
The value inside jsonData can be pasted into the Body Data tab by using ${jsonData}

03_http

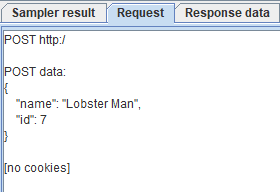
Run the script again and take a look at the View Results Tree:

06_viewtree

In addition, you can access the same value inside the JSR223 Post Processor using the vars.get method.

Groovy code:

04_JSR

Log viewer:

05_log

JSR223 Tips and Tricks Part 1

You can script using multiple languages within Jmeter.  Beanshell and Groovy both run lightning quick and are 99% (or thereabouts) compatible with standard java syntax.  Both languages can be utilized inside the JSR223 Post Processor.

In this tutorial series I will demonstrate some tips and tricks that will help you manipulate data for API testing with Jmeter.  I am assuming that you are already somewhat familiar with Jmeter and Java.

First create a new Jmeter script and add a UDV to intialize the variables.

01_udv

${Server} = This is the main URL of the web service
${Protocol} = Communications protocol

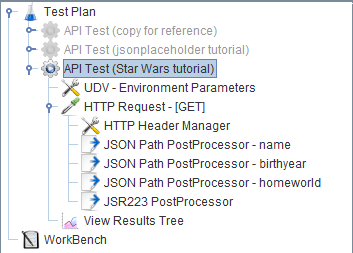
Setup the Test Plan in Jmeter as follows:

  • Create a Thread Group.
  • Create an HTTP Request.
  • Select GET in the Method dropdown.

02_get.png

  • Add an HTTP Header Manager to the HTTP request.
  • Add three JSON Path Post Processors to the HTTP request.
  • Add a JSR223 Post Processor to the HTTP request.

When finished, you node tree should look something like this:

03_tree

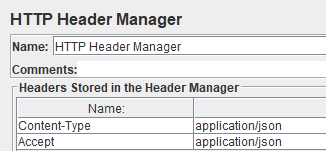
The response is expected to be in JSON format, so the Content-Type and Accept should both be set to “application/json”.  Configure the Header Manager as follows:

04_header

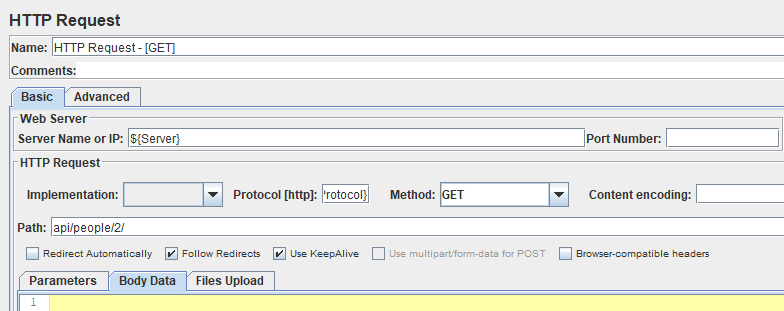
We are going to run a GET request against the public Star Wars API.

The GET request should look like this (Body Data is blank in this request):

05_http

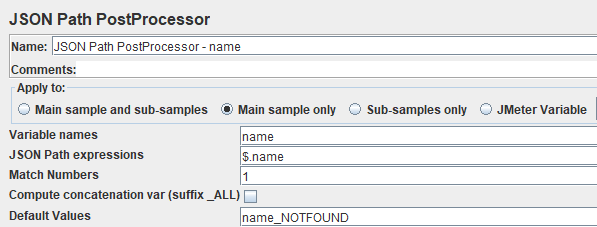
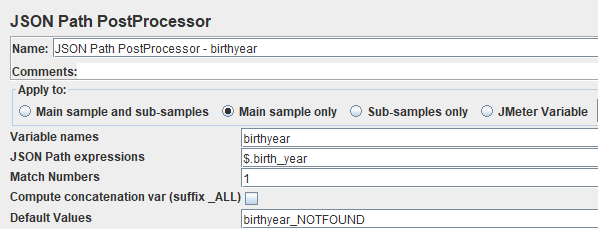
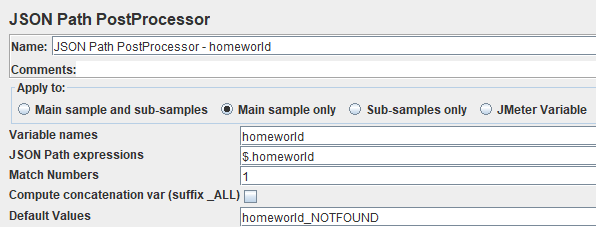
Use the JSON Path Post Processors to easily scrub the response for specific values:

06_jsrName

07_jsrBirth

08_jsrHome

Inside the JSR223 Post Processor under the GET request, select Beanshell in the programming language dropdown and paste the following code in the script box:

//get extracted values from vars created in JSONPath Post Processors
String extName = vars.get("name");
String extBirth = vars.get("birthyear");
String extHome = vars.get("homeworld");

//get response from prev sampler
String getResponse = prev.getResponseDataAsString();

//print response data to log
log.info("\n" + "Extracted name => " + extName + "\n" +
   "Extracted birthyear => " + extBirth + "\n" +
   "Extracted homeworld => " + extHome + "\n" +
   "Entire GET Response is:" + "\n" + getResponse + "\n");

This should print the following to the log viewer:

09_viewer

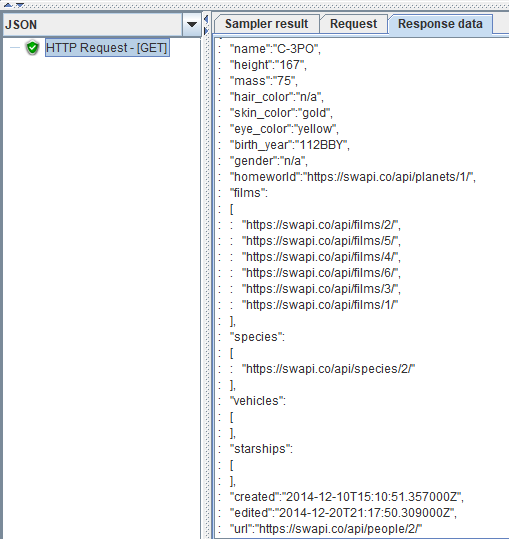
To see the entire reponse in JSON format, add a View Result Tree listener to your test and select JSON next to the Response Data tab.

10_json

What did we do here ?

  1.  We used the built-in JSON-Path extractors to do the dirty work and get three specific values that we need from the response.  This can also be accomplished by writing code inside a JSR223 Post Processor.  Instead we used built-in extractors, so there was no need to import any libraries or write any extra code.
  2.  We used Correlation to store extracted values in variables that can be accessed at any point inside the thread.
  3.  We passed the extracted values into the JSR223 Post Processor and printed them inside the log viewer.  These values could just as easily be written to a text log file or a CSV output file.
  4. We used the prev variable to get the entire JSON response as a string.


QuickStart RestSharp

crue

Do you remember that Motley Crue song from the 1980’s…

“WHOA !!  YEAH !!  Quickstart RestSharp, give it a start !”

Yeah… me neither. I’m pretty sure these guys weren’t talking about coding anyway.

RestSharp is an open source API test tool written for .NET

Why use RestSharp ?  It has built in deserializers for both XML and JSON, multiple options for authentication, and other features.  Sure, you can build all of these requests from scratch, but why reinvent the wheel ?  Less time spent coding/debugging leaves more time for testing.

The easiest way to add RestSharp to your Visual Studio project is to use the NuGet package manager:

01_restsharp

In this example we are going to perform a GET request using a Wikipedia API.

For more information regarding this API, please visit this link:
https://www.mediawiki.org/wiki/API:Main_page

Refer to the inline comments to see exactly what is happening inside the code sample:

using System;
using System.Collections.Generic;
using System.Linq;
using System.Text;
using System.Threading.Tasks;

using RestSharp;
using RestSharp.Deserializers;

namespace RestSharpSample
{
 class Program
 {
   static void Main(string[] args)
   {
     ExRestSharp();
   }

   static void ExRestSharp()
   {
      //create client and set URL
      String uriTest = "https://en.wikipedia.org/w/api.php";
      var client = new RestClient();
      client.BaseUrl = new Uri(uriTest);

      //create GET request and execute
      String uriAppend = "?action=query&titles=Main%20Page&prop=revisions&rvprop=content&format=json";
      var request = new RestRequest(uriAppend, Method.GET);
      IRestResponse response = client.Execute(request);

      //deserialize JSON response and store in dictionary
      RestSharp.Deserializers.JsonDeserializer deserial = new JsonDeserializer();
      var JSONresp = deserial.Deserialize<Dictionary<string, string>>(response);
 
      //write to console
      foreach (KeyValuePair<string, string> kvp in JSONresp)
      {
        Console.WriteLine(kvp.Value.ToString());
      }
    }
  }
}

The console output should look something like this:

02_console

As you can see, it is mostly nonsense and not much help.  If you are planning to test API’s for expected responses, you will need figure out the best way to slice and dice the JSON in order to validate expected values.

C# Selenium Tutorial Part 3

In this article we will take a look at how to setup a test suite using MS-TEST framework.

MS-TEST framework has many built-in features.  These are the features that we will look at in this example:

  1. Using an Assert
  2. Using Annotations
  3. Using the test runner to execute tests

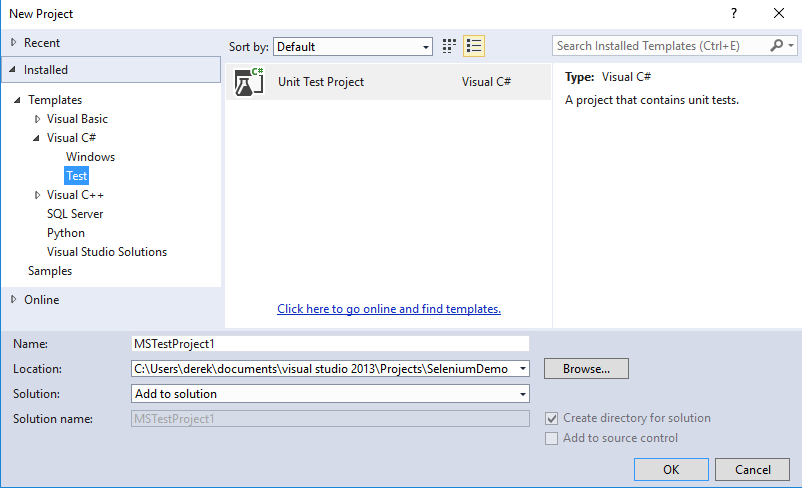
To add a test suite to an existing project, go into the File menu and add a new project.
Select C# unit test project and add to your existing solution:

01_newtest

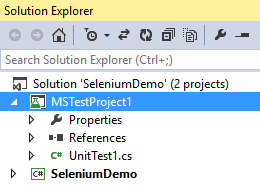
Open the Solution Explorer and you should see two projects inside your solution:

02_solution

Right-click on the test project and add references to the Selenium DLL’s:

03_ref

Next right-click on the test project and add another unit test to your unit test project:

04_addtest

Paste the below code inside the two unit tests:

using System;
using Microsoft.VisualStudio.TestTools.UnitTesting;
using OpenQA.Selenium;
using OpenQA.Selenium.Chrome;
using OpenQA.Selenium.Support.UI;

namespace MSTestProject1
{
 [TestClass]
 public class UnitTest1
 {
 //initialize webdriver
 IWebDriver driver;
 //this is the expected text in the browser title
 private string yahExpTitle = "Yahoo";

 [TestInitialize]
 public void SetupTest()
 {
 driver = new ChromeDriver(@"C:\chromedriver");
 }
 
 [TestMethod]
 public void YahooTestMethod()
 {
 driver.Navigate().GoToUrl("https://www.yahoo.com");
 //use an Assert to compare actual title to expected title
 Assert.IsTrue(driver.Title == yahExpTitle);
 }

 [TestCleanup]
 public void TearDown()
 {
 driver.Quit();
 }
 }
}
using System;
using Microsoft.VisualStudio.TestTools.UnitTesting;
using OpenQA.Selenium;
using OpenQA.Selenium.Chrome;
using OpenQA.Selenium.Support.UI;

namespace MSTestProject1
{
 [TestClass]
 public class UnitTest2
 {
 //initialize webdriver
 IWebDriver driver;
 //this is the expected text in the browser title
 private string msnExpTitle = "MSN.com - Hotmail, Outlook, Skype, Bing, Latest News, Photos & Videos";

 [TestInitialize]
 public void SetupTest()
 {
 driver = new ChromeDriver(@"C:\chromedriver");
 }

 [TestMethod]
 public void MsnTestMethod()
 {
 driver.Navigate().GoToUrl("https://www.msn.com");
 //use an Assert to compare actual title to expected title
 Assert.IsTrue(driver.Title == msnExpTitle);
 }

 [TestCleanup]
 public void TearDown()
 {
 driver.Quit();
 }
 }
}

We have utilized Asserts to compare actual and expected values.

An Assert is a boolean comparison tool that works like this:

Assert.isTrue(valueA == valueB);

If true, the script will continue.  If false, it will thrown an exception.  The reasoning behind this is that your assertions are expected to be true.  If false, something is wrong and your script needs to be debugged.  An assert will put an immediate end to your test.  If you want your test to continue after a failed validation, you need to find a different way to compare expected values.

Another thing to note here is the use of Annotations.  These are used to organize your test and the purpose of each Annotation should be obvious:

[TestClass]

   [TestInitialize]  //Setup

   [TestMethod]   //Most of the code goes here.  You can use more than one method.

   [TestCleanup]  //Cleanup

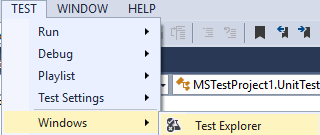
Next go into the Test menu and make the Test Explorer visible:

05_explorer

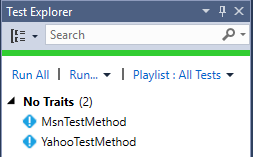
Build your project then click on Run All to run the tests in sequential order:

06_list

First you should see a browser open and close.

Then another browser should open and close.

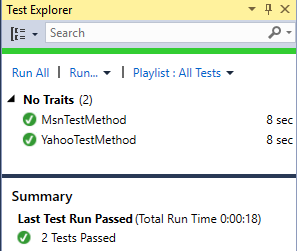
The test results will be summarized in the Test Explorer view:

07_results

C# Selenium Tutorial Part 2

In this article we will take a look at how to implement the PageObject model into our solution.  Using PageObjects enables you to group your page element locators and page actions into a single class.  You can quickly build tests using these class functions.  Also, any page specific edits in the future can be made in a centralized location.

In this example we are going to perform a search on Amazon and navigate to the second page of search results.  First create two page classes.  One is for the home page (AmazonHome.cs), and the other is for the search results page (AmazonResults.cs).

AmazonHome.cs

using System;
using System.Linq;
using System.Text;
using OpenQA.Selenium;
using OpenQA.Selenium.Chrome;
using OpenQA.Selenium.Interactions;
using OpenQA.Selenium.Support.PageObjects;
using OpenQA.Selenium.Support.UI;

namespace SeleniumDemo
{
 public class AmazonHome
 {
   private readonly string amazonUrl = "https://www.amazon.com/";
   private readonly IWebDriver driver;

   public AmazonHome(IWebDriver driver)
   {
     this.driver = driver;
   }

  //web element locators
  private readonly string searchDropdown = "searchDropdownBox";
  private readonly string searchTextbox = "twotabsearchtextbox";
  private readonly string searchButton = "//*[@id='nav-search']/form/div[2]/div/input";

  //this test action is a collection of class methods
  public AmazonHome AmazonSearch(string searchDept, string searchString)
  {
   try
   {
    AmazonNavigate();
    SelectDepartment(searchDept);
    EnterSearchCriteria(searchString);
    ClickSearch();
   }
   catch (Exception e)
   {
    Console.WriteLine("Encountered an error during item search. Stack trace = " + e.Message);
   }
   return this;
  }

  //navigate to Amazon URL
  public AmazonHome AmazonNavigate()
  {
   try
   {
    driver.Navigate().GoToUrl(amazonUrl);
   }
   catch (Exception e)
   {
    Console.WriteLine("Encountered a navigation error. Stack trace = " + e.Message);
   }
   return this;
  }

  //select by text in dropdown
  public AmazonHome SelectDepartment(string selectText)
  {
   try
   {
    //create a SelectElement and locate dropdown item by text
    SelectElement deptSelect = new SelectElement(driver.FindElement(By.Id((searchDropdown))));
    deptSelect.SelectByText(selectText);
   }
   catch (Exception e)
   {
    Console.WriteLine("Encountered an error when trying to access dropdown. Stack trace = " + e.Message);
   }
   return this;
  }

  //enters text into search textbox
  public AmazonHome EnterSearchCriteria(string searchText)
  {
   driver.FindElement(By.Id(searchTextbox)).SendKeys(searchText);
   return this;
  }

  //clicks search button
  public AmazonHome ClickSearch()
  {
   driver.FindElement(By.XPath(searchButton)).Click();
   return this;
  }
 }
}

AmazonResults.cs

using System;
using System.Linq;
using System.Text;
using OpenQA.Selenium;
using OpenQA.Selenium.Chrome;
using OpenQA.Selenium.Interactions;
using OpenQA.Selenium.Support.PageObjects;
using OpenQA.Selenium.Support.UI;

namespace SeleniumDemo
{
 public class AmazonResults
 {
  private readonly IWebDriver driver;

  public AmazonResults(IWebDriver driver)
  {
   this.driver = driver;
  }

  //web element locators
  private readonly string resultsNext = "//*[@id='pagnNextLink']/span[2]";

  //click method
  public AmazonResults AmazonClickNext()
  {
   try
   {
    driver.FindElement(By.XPath(resultsNext)).Click();
   }
   catch (Exception e)
   {
    Console.WriteLine("Encountered an error while trying to click next button. Stack trace = " + e.Message);
   }
   return this;
  }
 }
}

In the Program.cs we will create instances of these PageObject classes and execute the search workflow.

using System;
using System.Linq;
using System.Text;
using OpenQA.Selenium;
using OpenQA.Selenium.Chrome;
using OpenQA.Selenium.Support.UI;

namespace SeleniumDemo
{
 class Program
 {
  static void Main(string[] args)
  {
  //test vars
  string itemDept = "CDs & Vinyl";
  string itemName = "Van Halen";

  //setup chromedriver
  var options = new ChromeOptions();
  options.AddArguments("test-type");
  options.AddArgument("--start-maximized");
  IWebDriver driver = new ChromeDriver(@"C:\chromedriver", options);

  try
  {
   //instance of AmazonHome PageObject
   AmazonHome amazonHomePageObject = new AmazonHome(driver);
   amazonHomePageObject.AmazonSearch(itemDept, itemName);
   //instance of AmazonResults PageObject
   AmazonResults amazonResultsPageObject = new AmazonResults(driver);
   amazonResultsPageObject.AmazonClickNext();
  }
  catch (Exception e)
  {
   Console.WriteLine("Encountered an unforeseen error. Stack trace = " + e.Message);
  }

  //close chromedriver
  driver.Quit();
  }
 }
}

First you should see a browser launch and do a search on Amazon.

01_vhdlr

Then you should see the Next Page button get clicked and proceed to the second page of search results.

01_vhdiver

At the end of the test, the browser should close itself.

Note that some of web element types were handled differently:

SelectElement deptSelect = new SelectElement(driver.FindElement(By.Id((searchDropdown))));
deptSelect.SelectByText(selectText);

We handled the dropdown by creating a SelectElement object.  Then we selected a specific item in the dropdown using the text property of the dropdown.

Also, we introduced the concept of a test action.  A call to the AmazonSearch function performs four consecutive actions:

    // 1) Navigates to the Amazon home page
    AmazonNavigate();
    // 2) Selects the search category in the dropdown
    SelectDepartment(searchDept);
    // 3) Enters the search text
    EnterSearchCriteria(searchString);
    // 4) Clicks the search button
    ClickSearch();

I would recommend ordering these actions in the same order they occur on the webpage.  This way your code will make more sense to someone else reading your code and it will be easier to determine where updates should be made in the future.

Think about how you would prefer to group together page specific test actions.  After grouping, think about how you you like to drive a chain of events by calling consecutive test actions.  Maybe you want to group all of your test actions into a keyword.  These are the types of questions you should be asking while developing your test framework.

C# Selenium Tutorial Part 1

If you are looking to use automation to test a website, one of the best open source options available is Selenium.  If you need to test desktop apps or other non-web apps, Selenium is not the right solution for you.

Selenium itself is only a set of tools, you will need to code your tests using a test framework and an IDE.  Selenium works with a number of languages — java is the most popular.  There are plenty of examples online showing how to use Selenium with java.

This tutorial series will be dedicated to C#.  I recently did a fresh install of Visual Studio on my laptop and all of this code has been tested.

In this article I am going to show you how to:

  • Create a test project
  • Add Selenium DLL’s to the project
  • Write Selenium tests from scratch using C#

Step 1.  Download a Visual Studio IDE if you don’t already have one.  Microsoft offers many different versions of Visual Studio.

In these examples I am using Microsoft Visual Studio Express 2013 for Windows Desktop (which is free).

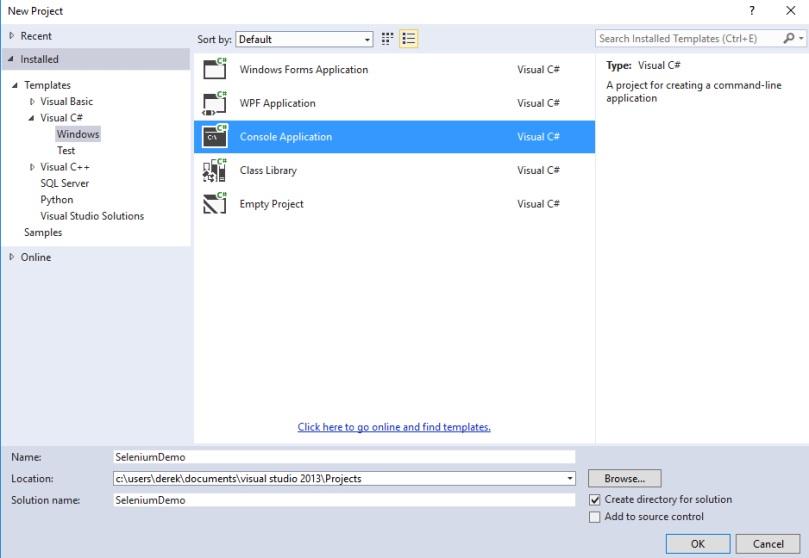
Step 2.  Create a new C# console app and name the solution “SeleniumDemo”

pic1_console

Step 3.  Get the latest Selenium DLL’s from:

http://www.seleniumhq.org/

pic2_bindings

Unzip the DLL’s and save to C:\selenium-dotnet-3.3.0\

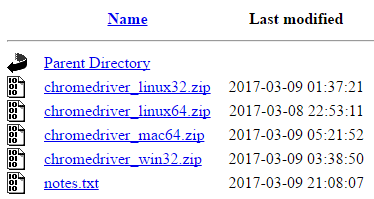
Step 4.  Get the latest version of chromedriver from:

https://sites.google.com/a/chromium.org/chromedriver/

pic3_chromedriver

Unzip the chromedriver and save to C:\chromedriver\

Step 5.  Add project references pointing to the Selenium DLL’s

pic4_refs

Step 6.  Use the Program class to create a simple self-contained browser test

(Refer to inline comments to understand what is happening)

using System;
using System.Linq;
using System.Text;
using OpenQA.Selenium;
using OpenQA.Selenium.Chrome;
using OpenQA.Selenium.Support.UI;

namespace SeleniumDemo
{
 class Program
 {
 static void Main(string[] args)
  {
   //test vars
   string myTestUrl = "https://wordpress.com";
   string myId = "mynameisfred";
   string myPw= "fredflintstone";
   int myTimeout = 10;

   //set chromedriver options
   var options = new ChromeOptions();
   //this will get rid of the yellow warning bar
   options.AddArguments("test-type");
   //this will maximize the browser
   options.AddArgument("--start-maximized");
   //this creates a new chromedriver instance
   IWebDriver driver = new ChromeDriver(@"C:\chromedriver", options);

   try
   {
    //navigate to URL
    driver.Navigate().GoToUrl(myTestUrl);
    //wait for login link to appear
    WebDriverWait wait = new WebDriverWait(driver, TimeSpan.FromSeconds(myTimeout));
    wait.Until(ExpectedConditions.ElementExists(By.Id("navbar-login-link")));
    //click login link
    driver.FindElement(By.Id("navbar-login-link")).Click();
    //enter ID and PW
    driver.FindElement(By.XPath("//*[@id='user_login']")).SendKeys(myId);
    driver.FindElement(By.XPath("//*[@id='user_pass']")).SendKeys(myPw);
    //click button
    driver.FindElement(By.Id("wp-submit")).Click();
   }
   catch (Exception e)
   {
    Console.WriteLine("Encountered an unforeseen error. Stack trace = " + e.Message);
   }
  }
 }
}

Step 7.  Build and run.

You should see a new browser launch and attempt to login using a bogus ID/PW combo.

This script utilized Selenium functions called WebDriverWait and By.

In the code sample below, WebDriver will wait until a certain condition is met or until a timeout occurs.  If you get a timeout, WebDriver will throw an exception.

WebDriverWait wait = new WebDriverWait(driver, TimeSpan.FromSeconds(myTimeout));
wait.Until(ExpectedConditions.ElementExists(By.Id("navbar-login-link")));

WebDriver finds the login web element using an ID locator:

driver.FindElement(By.Id("navbar-login-link")).Click();

Elsewhere in the script, XPath was used as a locator instead of ID.

MIM Telecaster

Growing up I was not a fan of the telecaster.  I thought it was ugly.  It only has two knobs and one switch.  It didn’t have a whammy bar, a floyd rose bridge, a locking nut, or any pointy edges.

However, I spotted this curvy blonde and I could not resist.  According to the serial number, this guitar was made at the Fender factory in Mexico in 2008.  It was owned by a student for years and has barely been played.

I tried out dozens of guitars before I bought this one.  Too many modern guitars are made out of lightweight woods which are brittle and feel like balsa wood.  This guitar has a bright maple neck which feels solid like a baseball bat.  It came with a white pickguard but I decided to install a blue one about a month after I got it.

I am currently working on a new tutorial series and will post part one next month.

teleStack

teleShiny

HP ALM REST API

Many companies use HP ALM (formerly known as Quality Center) for storing test cases and test results.  ALM’s companion test automation tool is another HP product called UFT (formerly know as QTP).  If you use another automation tool (for example… Selenium), it is not easy to save test results in ALM.  While it is not easy, it is possible to save external test results to ALM using an HP API.  HP has provided two API’s that can be used to do this:

A) OTA API

B) REST API

There are plenty of examples on the web if you want to use the OTA.  I would suggest against doing this since the REST API is newer and will be supported going forward.

In this article I am going to show you how to log external test results using a series of web service requests:

  1. Authentication
  2. Create a new session
  3. Using a testset ID to return a list of test ID’s
  4. Create a new testrun in testlab
  5. Update the new testrun in testlab
  6. Logout

You will need to build requests, submit them to the ALM server, and then extract crucial data from the response XML.  The examples in this article are code agnostic so it will be up to you to write and execute the requests.  When I did this in C# I wrote the HTTP requests by hand, but you might find it easier to use a REST client like RestSharp.  If you are scripting in another language, there are a plethora of REST clients available for Java, Javascript, Python, etc.

1) Authentication

To authenticate, update this XML with your credentials and submit as a POST request.

Request Type:  POST

Header:
ContentType = “application/xml”
Accept = “application/xml”

Cookie Container:  N/A

URI:

http://targetserver:targetport/qcbin/authentication-point/alm-authenticate

XML:

<alm-authentication>
 <user>ALMusername</user> 
 <password>ALMpassword</password> 
</alm-authentication>

You should get a successful response from the server.  If not, you need to double check your credentials and fix this request before attempting to proceed any further.

Make sure to extract the LWSSO_COOKIE_KEY value from the response XML and store that value inside a variable which will be used in subsequent requests.

2) Create a new session

Now that you are authenticated, you must create a new session before you can do anything else.  When you build this request, you must also create a cookie container and add the LWSSO_COOKIE_KEY value to the container.

Request Type:  POST

Cookie Container:

  • LWSSO_COOKIE_KEY

Header:
ContentType = “application/xml”
Accept = “application/xml”

URI:

http://targetserver:targetport/qcbin/rest/site-session

XML:  N/A

You must extract three values (QCSession, ALM_USER, XSRF-TOKEN) from the response XML and store these values inside variables which will be used in subsequent requests.

3) Using a testset ID to return a list of test ID’s

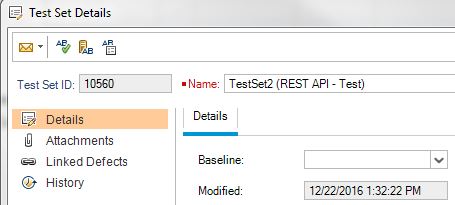
You need to get the config ID, test ID, and testset ID of the testset that you want to update in ALM testlab. The testset ID will be used to run a query to get a list of test instance ID’s.

In this example my testset is a manual test.  To get the testset ID, right-click on the testset and select “Test Set Details”
testset

Request Type:  GET

Header:
ContentType = “application/xml”
Accept = “application/xml”

Cookie Container:

  • LWSSO_COOKIE_KEY
  • QCSession
  • ALM_USER
  • XSRF-TOKEN

URI:

http://targetserver:targetport/qcbin/rest/domains/ALMDomain/projects/ALMProject/test-instances?query={cycle-id[#####]}

(##### is the testset ID)

XML:  N/A

This is the portion of the response XML that we are interested in:

<Field Name="id">
 <Value>#####</Value>
</Field>

This is the test instance ID.  You will want to create a list or array to hold all of these ID’s.

For the purpose of this article we will only be using the first test instance ID found inside the XML response.

4) Create a new testrun in testlab

What we want to do next is create a new test run with the minimum amount of required fields.  You may have different required fields in your ALM project, so you might need to tweak the XML a bit.

Request Type:  POST

Header:
ContentType = “application/xml”
Accept = “application/xml”

Cookie Container:

  • LWSSO_COOKIE_KEY
  • QCSession
  • ALM_USER
  • XSRF-TOKEN

URI:

http://targetserver:targetport/qcbin/rest/domains/ALMDomain/projects/ALMProject/runs

XML:

<Entity Type='run'>
 <Fields>
 <Field Name='name'><Value>testnamegoeshere</Value></Field>
 <Field Name='test-instance'><Value>1</Value></Field>
 <Field Name='testcycl-id'><Value>testcycleidgoeshere</Value></Field> 
 <Field Name='cycle-id'><Value>cycleidgoeshere</Value></Field>
 <Field Name='test-id'><Value>testidgoeshere</Value></Field>
 <Field Name='subtype-id'><Value>hp.qc.run.MANUAL</Value></Field>
 <Field Name='status'><Value>Not Completed</Value></Field>
 <Field Name='owner'><Value>testownergoeshere</Value></Field> 
 </Fields>
</Entity>

Please note that you should set the test status as “Not Completed“.

This is the portion of the response XML that we are interested in:

 <Field Name="id"><Value>#####</Value></Field>
 <Field Name="test-config-id"><Value>#####</Value></Field>
 <Field Name="testcycl-id"><Value>#####</Value></Field>
 <Field Name="cycle-id"><Value>#####</Value></Field>
 <Field Name="test-id"><Value>#####</Value></Field>

In this response, the “id” field value refers to the “id” of the new test run.  Make sure to double check all of these values before sending the next request.

Some of these naming conventions can be confusing. This is how I identify them:

test-config-id = config ID from testlab [column name = Configuration: ID]
testcycle-id = this is the test instance ID [from Step 3]
cycle-id = this is the test set ID [right-click on testset to get this]
test-id = test ID from testlab [column name = Configuration: Test ID]

5) Update the new testrun in testlab

The most important thing to remember here is that you should set the pass/fail test status during this PUT request, not the previous POST request.  When you update the status of the test run as part of this PUT request, the status of the test instance gets updated automatically.

If you attempt to POST a new test run and pass/fail it at the same time, the test instance will not get updated with the status of the latest run.  It is possible to update the test instance directly.  I would not recommend doing this because this will create a duplicate fast run.  If you are running lots of tests, you don’t want the results to get cluttered with fast runs.

Request Type:  PUT

Header:
ContentType = “application/xml”
Accept = “application/xml”

Cookie Container:

  • LWSSO_COOKIE_KEY
  • QCSession
  • ALM_USER
  • XSRF-TOKEN

URI:

http://targetserver:targetport/qcbin/rest/domains/ALMDomain/projects/ALMProject/runs/#####

XML:

<Entity Type='run'>
 <Fields>
 <Field Name='test-instance'><Value>1</Value></Field>
 <Field Name='execution-date'><Value>yyyy-mm-dd</Value></Field>
 <Field Name='ver-stamp'><Value>1</Value></Field>
 <Field Name='test-config-id'><Value>configidgoeshere</Value></Field>
 <Field Name='name'><Value>testnamegoeshere</Value></Field>
 <Field Name='has-linkage'><Value>N</Value></Field>
 <Field Name='testcycl-id'><Value>testcycleidgoeshere</Value></Field>
 <Field Name='cycle-id'><Value>cycleidgoeshere</Value></Field>
 <Field Name='host'><Value>machinenamegoeshere</Value></Field>
 <Field Name='status'><Value>Passed</Value></Field>
 <Field Name='test-id'><Value>testidgoeshere</Value></Field>
 <Field Name='subtype-id'><Value>hp.qc.run.MANUAL</Value></Field>
 <Field Name='draft'><Value>N</Value></Field>
 <Field Name='duration'><Value>0</Value></Field>
 <Field Name='owner'><Value>testownergoeshere</Value></Field>
 </Fields>
</Entity>

6) Logout

Logout and kill the active ALM session when done.

Request Type:  GET

Header:  N/A

Cookie Container:  N/A

URI:

http://targetserver:targetport/qcbin/authentication-point/logout

XML:  N/A

Once your code is refined, you can build a DLL, JAR, etc and and have your test framework pass in arguments like test project, test ID, test status, test owner, etc