Jmeter Randomization Part 1 – Random

When running load tests with jmeter, we are primarily concerned with the overall performance of the application.  If functional testing is a secondary concern, running the exact same data over and over again is an easy habit to fall into.

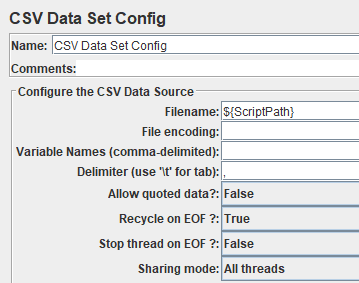
In any type of test suite, it is a best practice to vary the data.  If you are using a CSV data file to drive the test, you can vary the data in your test rows.  Keep in mind that the CSV is a finite list which can be recycled when using jmeter’s CSV Data Set Config.

Luckily there are a number of ways to randomize your data inside jmeter.  In this tutorial series we are going to look at how to randomize your test data during runtime.

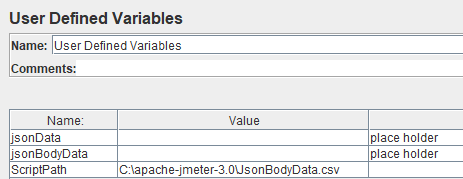
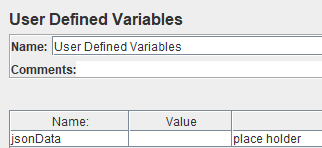
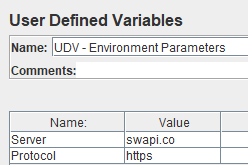
Inside this UDV is a javascript function which generates a random integer between the range of 300 and 900:

01_udvRand

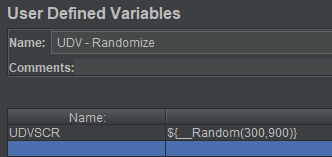
However, since this randomization is happening inside the UDV, the value is only randomized once at the beginning of the test.  So if the randomized value is 777, that variable value will not change and will be 777 for all threads.

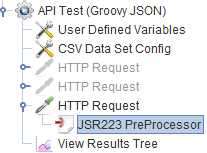
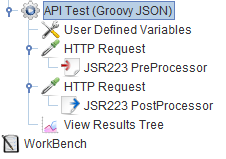
If you want to randomize values for all threads, you need to use a processor.

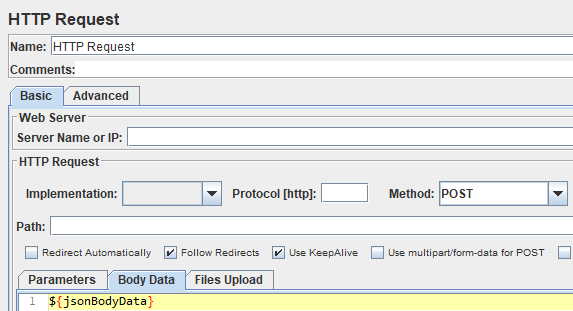
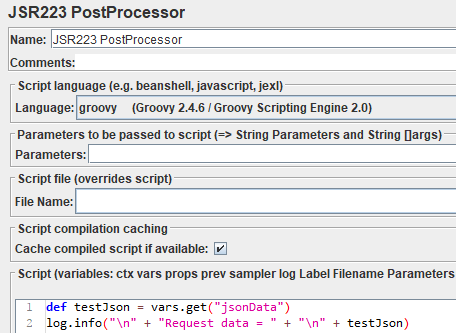
In this example we will use a JSR223 Pre Processor with a few lines of java:

//randomize credit score
int RNDSCR = ${__Random(300, 900)};
log.info("RNDSCR = " + RNDSCR);

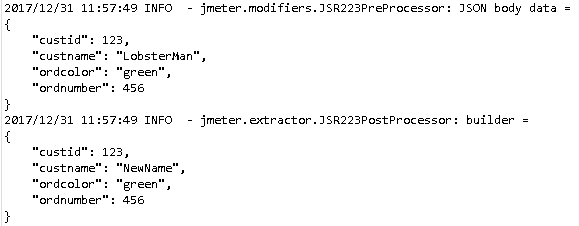
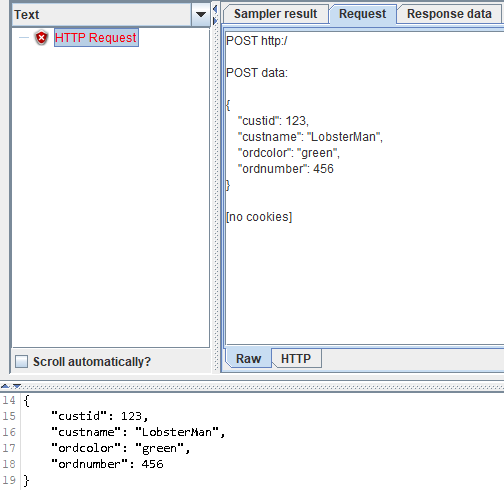
This is what you should see in the log console (with different random values for every thread):

02_logConsole


JSR223 Tips and Tricks Part 5

Jmeter is a wonderful tool but it does not work with excel out of the box.  In order to use excel in your jmeter script, you must download Fillo or a similar jar.  Fortunately, jmeter has built-in support for CSV file handling (input and output).

Let’s pretend that you have been given a new project where you need to test a web service and save the server response to a file.  If the response is formatted as JSON and you open the CSV file to view in excel, the response is comma delimited and will be split into separate columns.  If you are dealing with large and/or dynamic JSON responses, this can become very messy.  In order to view the entire JSON response in one cell, we need to use a workaround.

In this tutorial, we will use the public Star Wars API again.  Jmeter will send a GET request to the server and then the script will write the JSON response to file.

First create a new jmeter script that looks like the node tree below:

01_tree

Setup the HTTP Request sampler as follows:

02_http

Setup the HTTP Header Manager as follows:

03_header

Inside the JSR223 Post Processor, select beanshell as the language and paste this code:

import net.minidev.json.parser.JSONParser;

//get the JSON response from prev sampler
String getResponse = prev.getResponseDataAsString();

//parse the response and convert to string
JSONParser parser = new JSONParser(JSONParser.MODE_JSON_SIMPLE);
String parResponse = parser.parse(getResponse);
String preResponse = parResponse.toString();

//replace all commas with a semi-colon
String csvResponse = preResponse.replaceAll(",", ";");

//log response to file
logFileName = "C:/apache-jmeter-3.0/Web_Service_Output.csv";
BufferedWriter outLog = new BufferedWriter(new FileWriter(logFileName, true));
outLog.write(csvResponse + "\n");
outLog.close();

The code example above uses two jars.  Both of these jars are included in the standard version of jmeter, so you do not need to download any additional jars:

  1.  JSONParser – this is used to parse the JSON data
  2.  BufferedWriter – this is used to write to a CSV file

When the CSV file is opened in excel or another spreadsheet application, the entire JSON will be displayed in a single cell.  Here is a screenshot from Google Sheets:

04_cell

05_greedo

JSR223 Tips and Tricks Part 4

In this post we are going to continue using the same script from Part 3.  This is a simple example which demonstrates how to update a single field value in the JSON body data.

First right-click to add a JSR223 Post Processor to the test script:

01_postproc

Next select groovy as the programming language and paste the following code.  Note that we are using two groovy jars (1) JsonSlurper (2) JsonBuilder

import groovy.json.JsonSlurper
import groovy.json.JsonBuilder

//parse json using JsonSlurper
def slurpy = new JsonSlurper().parseText(vars.get("jsonBodyData"))

//update field value "custname" and rebuild json using JsonBuilder
def builder = new JsonBuilder(slurpy)

//update value of custname field
builder.content.custname = 'NewName'
vars.put("jsonBodyData", builder.toPrettyString()) 
log.info("builder = " + "\n" + builder.toPrettyString())

Now open the log viewer and run the script, the output should look like this:

02_viewer


JSR223 Tips and Tricks Part 3

When doing API testing, you may find that your test data can become unmanageable.  For example, if your test uses a collection of XML files or JSON files, your data files can become accumulate and become cluttered.  To reduce this technical debt, consider creating your test data dynamically using a single data file.

In the first tutorial in this series, I ran a GET request against a public API.
In the second tutorial, I showed how to easily build JSON data using a string.
In this installment we will generate JSON data using a CSV data file.

First add two more variables to your UDV:

01_udv

${jsonBodyData} = This will be used to store the new JSON body data
${ScriptPath} = This is the local path where the CSV is saved

Next create a CSV file to hold your test data:

(Text format)

02_textcsv

(Spreadsheet format)

03_spreadcsv

In order to pull test data from the CSV file, you must add a config element to the script called CSV Data Config.  Assign the ${ScriptPath} variable inside this element:

05_csvconfig

Now add an HTTP Request to your script and a JSR223 PreProcessor underneath.

04_pre

Select groovy in the language dropdown and paste the following code:

import groovy.json.*
import groovy.json.JsonBuilder

def jsonBuilder = new groovy.json.JsonBuilder()
jsonBuilder
{
 custid Integer.parseInt(vars.get("customerId"))
 custname vars.get("customerName")
 ordcolor vars.get("orderColor")
 ordnumber Integer.parseInt(vars.get("orderNumber"))
}

vars.put("jsonBodyData", jsonBuilder.toPrettyString())
log.info("JSON body data = " + "\n" + vars.get("jsonBodyData"))

In this example we used a groovy jar called JsonBuilder to build the request data.  Please note that the customerId and orderNumber were both formatted as an Integer.

The JSON data has been formatted and saved inside the ${jsonBodyData} variable.

Apply this variable to the HTTP Request.  Also, make sure that the POST method has been selected inside the HTTP Request:

06_body

Run the request.  If everything has been setup correctly, you should see the formatted JSON data inside the listener and the log viewer.

07_viewdata

JSR223 Tips and Tricks Part 2

In this tutorial I will demonstrate how to create and store JSON data using groovy.

First add a UDV to your test script and create an empty variable called ${jsonData}

01_udv

Next create a new HTTP Request and add a JSR223 PreProcessor below it.  Select groovy as the programming language in the dropdown and paste this code inside your script:

import groovy.json.JsonOutput;

def uName = "Lobster Man"
def uId = 7
def jsonString = ["name": uName, "id" : uId]
def jsonFormat = JsonOutput.prettyPrint(JsonOutput.toJson(jsonString))

log.info("\n" + jsonFormat)
vars.put("jsonData", jsonFormat)

Open the log viewer, run the script, and you should see the following:

02_info

Also, note that the formatted JSON was stored inside the UDV variable ${jsonData} by using the vars.put method.

Next add another HTTP Request sampler to your test script and add a JSR223 Post Processor below it.  Your script should now look something like this:

07_script

The value inside jsonData can be pasted into the Body Data tab by using ${jsonData}

03_http

Run the script again and take a look at the View Results Tree:

06_viewtree

In addition, you can access the same value inside the JSR223 Post Processor using the vars.get method.

Groovy code:

04_JSR

Log viewer:

05_log

JSR223 Tips and Tricks Part 1

You can script using multiple languages within Jmeter.  Beanshell and Groovy both run lightning quick and are 99% (or thereabouts) compatible with standard java syntax.  Both languages can be utilized inside the JSR223 Post Processor.

In this tutorial series I will demonstrate some tips and tricks that will help you manipulate data for API testing with Jmeter.  I am assuming that you are already somewhat familiar with Jmeter and Java.

First create a new Jmeter script and add a UDV to intialize the variables.

01_udv

${Server} = This is the main URL of the web service
${Protocol} = Communications protocol

Setup the Test Plan in Jmeter as follows:

  • Create a Thread Group.
  • Create an HTTP Request.
  • Select GET in the Method dropdown.

02_get.png

  • Add an HTTP Header Manager to the HTTP request.
  • Add three JSON Path Post Processors to the HTTP request.
  • Add a JSR223 Post Processor to the HTTP request.

When finished, you node tree should look something like this:

03_tree

The response is expected to be in JSON format, so the Content-Type and Accept should both be set to “application/json”.  Configure the Header Manager as follows:

04_header

We are going to run a GET request against the public Star Wars API.

The GET request should look like this (Body Data is blank in this request):

05_http

Use the JSON Path Post Processors to easily scrub the response for specific values:

06_jsrName

07_jsrBirth

08_jsrHome

Inside the JSR223 Post Processor under the GET request, select Beanshell in the programming language dropdown and paste the following code in the script box:

//get extracted values from vars created in JSONPath Post Processors
String extName = vars.get("name");
String extBirth = vars.get("birthyear");
String extHome = vars.get("homeworld");

//get response from prev sampler
String getResponse = prev.getResponseDataAsString();

//print response data to log
log.info("\n" + "Extracted name => " + extName + "\n" +
   "Extracted birthyear => " + extBirth + "\n" +
   "Extracted homeworld => " + extHome + "\n" +
   "Entire GET Response is:" + "\n" + getResponse + "\n");

This should print the following to the log viewer:

09_viewer

To see the entire reponse in JSON format, add a View Result Tree listener to your test and select JSON next to the Response Data tab.

10_json

What did we do here ?

  1.  We used the built-in JSON-Path extractors to do the dirty work and get three specific values that we need from the response.  This can also be accomplished by writing code inside a JSR223 Post Processor.  Instead we used built-in extractors, so there was no need to import any libraries or write any extra code.
  2.  We used Correlation to store extracted values in variables that can be accessed at any point inside the thread.
  3.  We passed the extracted values into the JSR223 Post Processor and printed them inside the log viewer.  These values could just as easily be written to a text log file or a CSV output file.
  4. We used the prev variable to get the entire JSON response as a string.